
Week04: Arduino IoTs – SMS

Nodemcu to SMS
สิ่งที่ควรรู้
IFTT

IFTTT หรือ IF This Then That คือบริการออนไลน์ที่ช่วยให้ผู้ใช้สามารถตั้งค่าการทำงานได้อย่างยืดหยุ่น ตามเงื่อนไขที่เราต้องการ ยกตัวอย่างเช่น
- ถ้าพรุ่งนี้ฝนตก ให้อีเมลแจ้งเตือน
- ถ้าเปลี่ยนรูปโปรไฟล์ในเฟซบุ๊ก ให้เปลี่ยนในทวิตเตอร์ด้วย
- ถ้ามีข่าวใหม่เกี่ยวกับสมาร์ทโฟน ให้แจ้งผ่าน RSS อัตโนมัติ
- ถ้าหุ้นขึ้น/ตก ให้แจ้งเตือน
- ฯลฯ
IFTTT ออกเสียงเหมือน Gift แต่ไม่มีตัว G ย่อมาจาก “If
This Then That” หรือแปลตรงๆ ว่า "ถ้าเป็นแบบนี้
ให้ทำแบบนั้น" โดย IFTTT จะทำงานตามคำสั่งในรูปแบบเงื่อนไขล่วงหน้า
เมื่อถึงเวลามันก็จะทำงานแทนเรานั่นเอง ฟังดูแล้วอาจจะยังงงๆ
อยู่บ้าง แต่ถ้าเข้าใจการทำงานของมันแล้ว คุณจะพบว่ามันง่ายและสะดวกสุดๆ
เมื่อเราล็อกอินเข้าไปแล้ว
จะเจอพื้นที่ที่ให้เราสร้าง Task หรือที่ IFTTT เรียกว่า Personal
Recipe นั่นก็คือการกำหนดว่าเราต้องการให้เจ้า IFTTT นี้เค้าทำงานอะไรแทนเราบ้าง
ยกตัวอย่างแบบ
Basic
สุด ก็อย่างเช่น ถ้า "ถึงวันที่ 15 ของทุกเดือน" ให้ "ส่งอีเมล์เตือนให้จ่ายบิลค่าโทรศัพท์"
เป็นต้น

อาจจะฟังดูง่ายๆ
เบสิค
แต่ถ้ามีแค่นี้เราคงไม่จำเป็นต้องพึ่งบริการของเจ้า IFTTT ให้ปวดหมอง แต่สิ่งที่ IFTTT ทำได้เจ๋งกว่านั้นก็คือ
เค้าสามารถทำงานแบบอัตโนมัติร่วมกับ Social Media ต่างๆ
รวมไปถึง productivity tool อีกหลายช่องทาง โดย IFTTT เรียกสิ่งเหล่านี้ว่า Channel ไม่ว่าจะเป็น facebook, twitter, drop box, evernote, instagram และอีกมากมาย

โดยเราสามารถสร้าง
Recipe
ที่เชื่อมโยง Channel ต่างๆ เข้าด้วยกันได้
อย่างเช่น ถ้า "อัพรูปใหม่ลงใน
Instagram" ให้"เซฟรูปลงใน Dropbox" ทีนี้ทุกครั้งที่เราอัพเดทรูปใหม่ๆ ลงใน Instagram รูปเหล่านั้นก็จะถูกเก็บไว้ใน
Dropbox ของเราด้วยโดยอัตโนมัติ
การสร้าง Personal Recipe ของ IFTTT เรียกว่าแทบจะไม่มีขอบเขต
ขอเพียงแต่เราสร้างกฎที่ต้องการให้ IFTTT ทำภายใต้ Channel ต่างๆ มากมายที่เค้ามีไว้ให้ ถ้าอยากได้ไอเดีย
ก็สามารถคลิกเข้าไปดูในแต่ละ Channel ได้ ว่ามีใครเค้าสร้าง "สูตร" แบบไหนเอาไว้แล้วบ้าง หรือเข้าไปดูที่ https://ifttt.com/recipes เผื่อจะได้ลองเอามาใช้ให้เหมาะกับความต้องการของเราค่ะ
ที่สำคัญเรายังสามารถเปิดหรือปิด Recipe ต่างๆ ได้ตลอด ถ้าช่วงนี้ยังไม่อยากให้ IFTTT ทำตามเงื่อนไขอันนี้ก็ปิดไปก่อนได้
อยากให้ทำอีกเมื่อไหร่ก็ค่อยเปิดขึ้นมาใช้งานต่อได้ทุกเมื่อ ก็แค่สั่งให้เจ้า IFTTT ทำงานแทนเราเท่านั้นเอง
มาเริ่มทดลองกันเลย!!!
เตรียมการทดลอง
1. เตรียม ESP8266 Board
2. เตรียม Arduino IDE พร้อมติดตั้ง ESP8266 Board
3. Download
and Install Library - https://github.com/witnessmenow/arduino-ifttt-maker/archive/master.zip
การทดลอง
1. สมัครสมาชิก IFTTT ที่ https://ifttt.com/

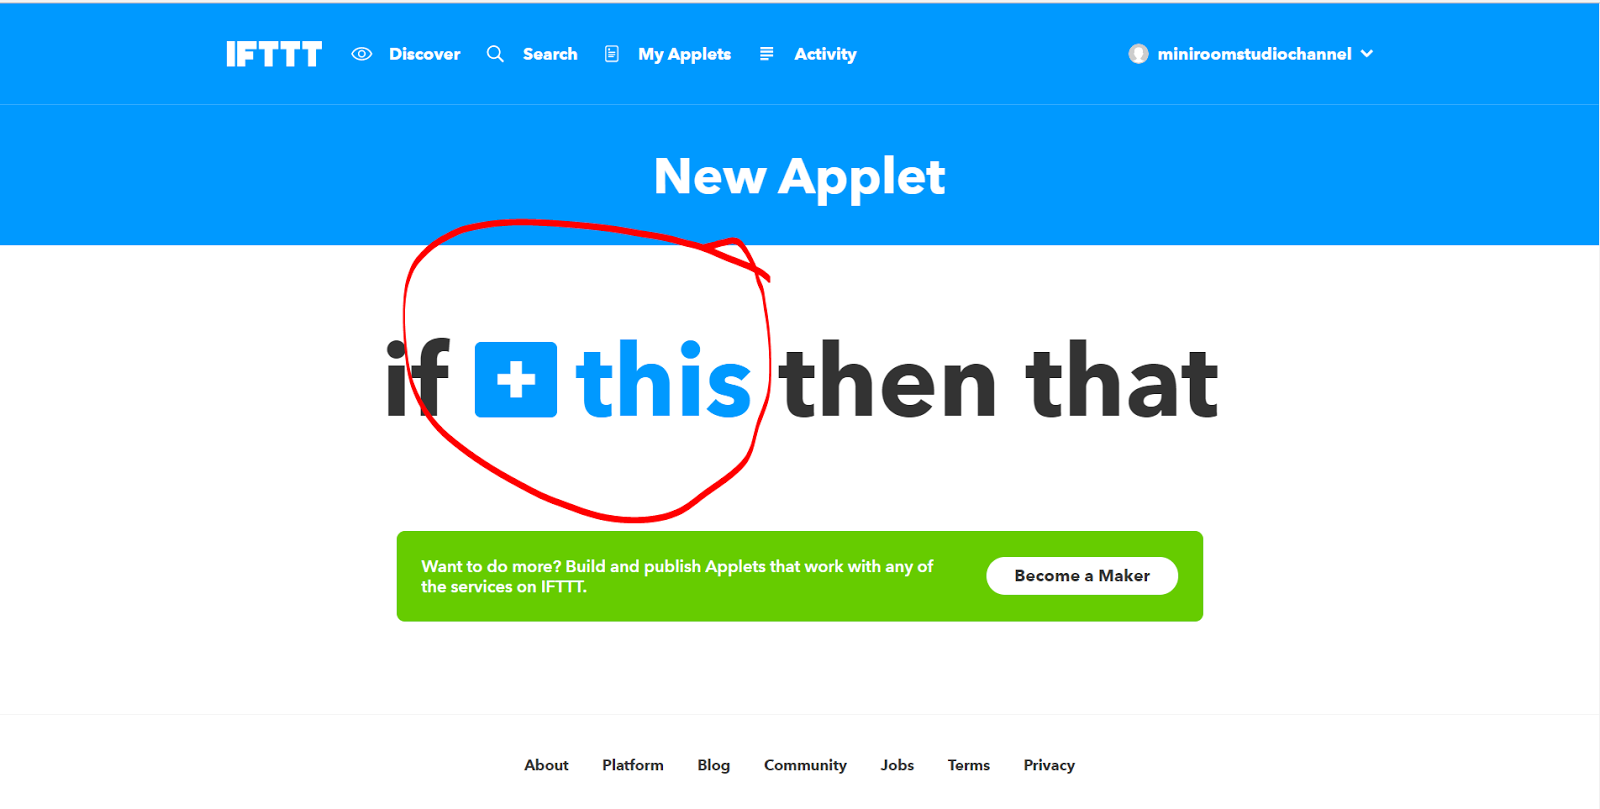
2. เมื่อสมัครเสร็จแล้ว ให้ login เข้าระบบ แล้วไปที่ "New Applet " ดังภาพ

3. แล้วคลิ๊ก ดังภาพ
4. พิมพ์ " Maker Webhooks " ในช่อง ค้นหา แล้วคลิ๊กที่ รูปดังภาพด้านล่างนี้

5. คลิ๊กตามลูกศร ในภาพ

6.ตั้งชื่อ ที่ Even Name แล้วคลิ๊ก ที่ Create trigger

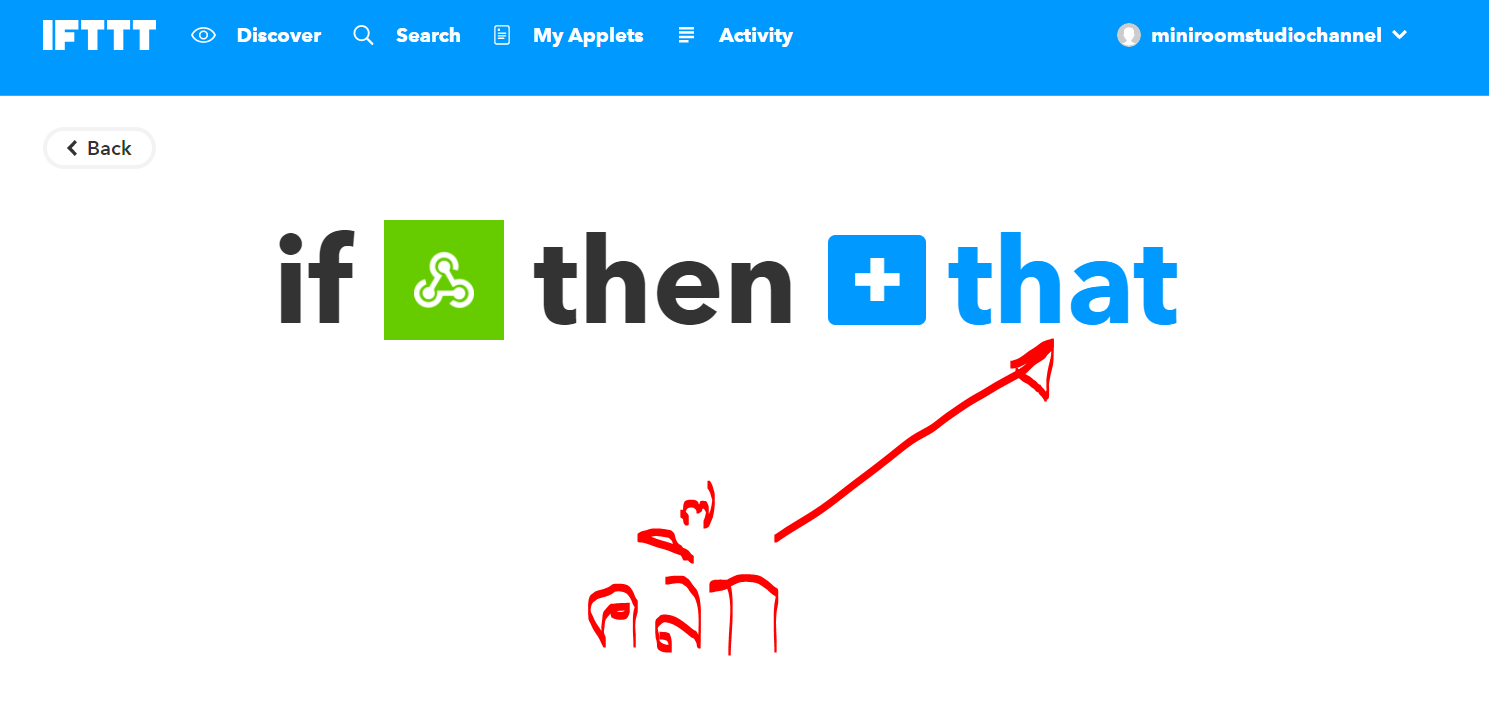
7. คลิ๊กที่ that ดังภาพ
8. คลิ๊กที่ SMS

9. คลิ๊ก connect

10. กรอกเบอร์โทรศัพท์ แล้วรอรับ PIN นำมากรอก แล้วกด connect

11. คลิ๊กดังภาพด้านล่างเลยครับ

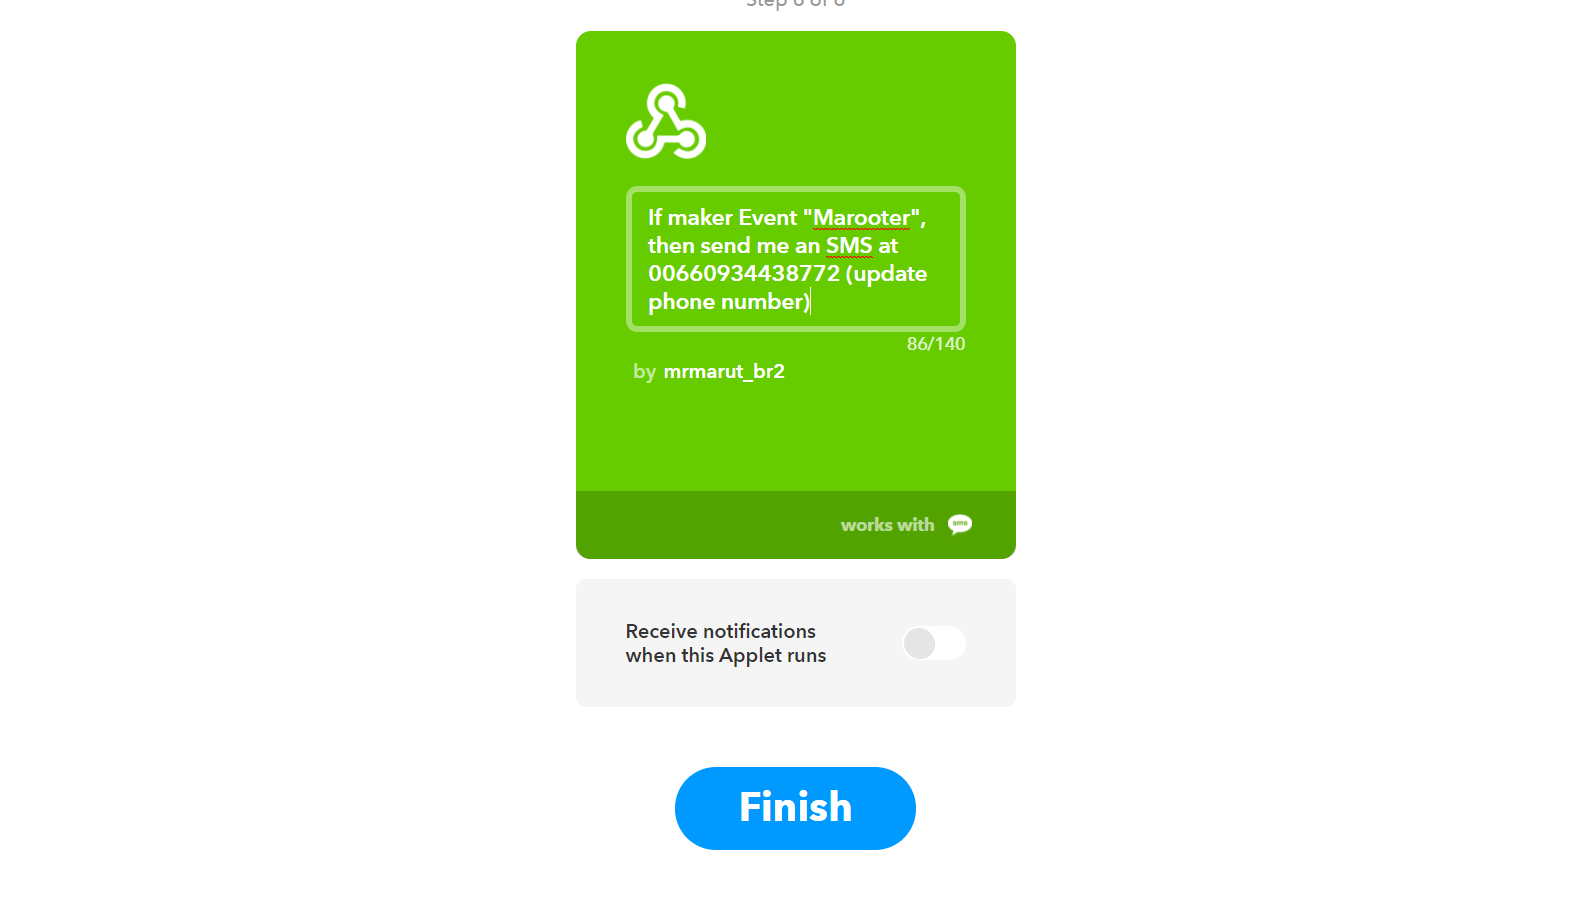
12. ใส่ข้อความที่ต้องการส่ง แลัวกด Create action

13. เสร็จแล้วครับ ต่อไปเรามาทดสอบกันครับ
มาทดสอบกันเลยครับ!!!

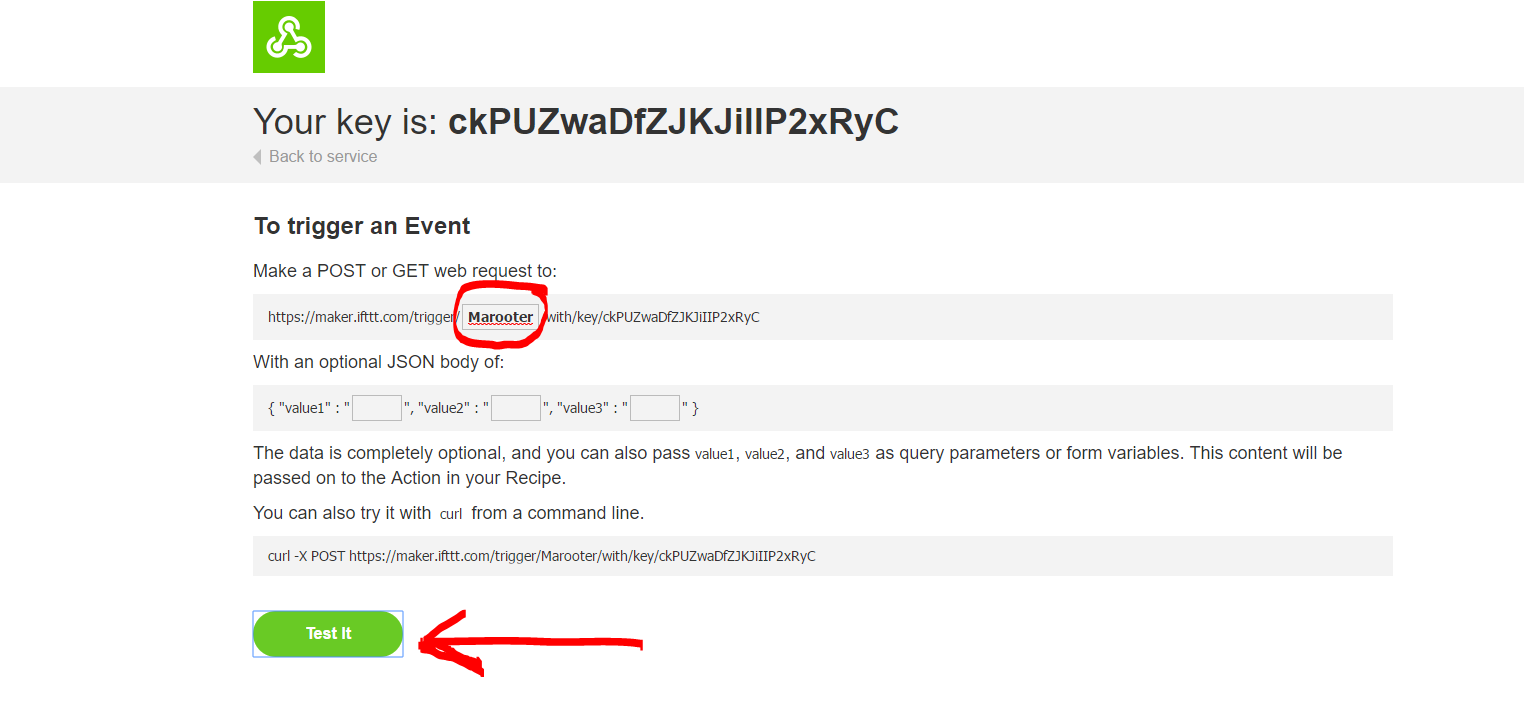
2. ใส่ Even Name ให้ตรงกับที่เรา ใส่ไปตอนแรก แล้วคลิ๊ก ที่ Test It หลังจากนั้นสังเกตุที่ มือถือของเรา ก็จะมี SMS เข้า...
ทดสอบด้วย Web browser!!!
1. https://maker.ifttt.com/trigger//with/key/ckPUZwaDfZJKJiIIP2xRyC

ทดสอบด้วย Nodemcu !!!
1. ติดตั้ง Library
- Download and Install Library - https://github.com/witnessmenow/arduino-ifttt-maker/archive/master.zip
2. ทดสอบด้วย NodeMCU ไปที่ File à Example à IFTTTMaker à ESP8266 à EventTriger
3. แก้ไข SSID, Password, Key และ EventName
char ssid[] = "SSID";
char password[] = "Password";
#define KEY "Key"
#define EVENT_NAME "EventName"

จาก NodeMCU to Mobile Phone SMS: ทดสอบการส่งข้อมูลไปแบบ
SMS
o
กดปุ่ม A ที่ต่อกับ NodeMCU – ให้ส่งข้อความ
“Over Heat Alarm”
o
กดปุ่ม B ที่ต่อกับ NodeMCU – ให้ส่งข้อความ
“Door Open Alarm”
o
กดปุ่ม C ที่ต่อกับ NodeMCU – ให้ส่งข้อความ
“Intruders Alarm”
Code ที่ใช้รัน
#include <ESP8266WiFi.h>
// constants won't change. They're used here to
// set pin numbers:
#define D0 16 // USER LED Wake
int Switch_Pin = D1; // the number of the pushbutton pin
int Switch_Pin2 = D2;
int Switch_Pin3 = D3;
#define LED_Pin D0 // the number of the LED pin
/****** Connect Router Part **********/
const char ssid[] = "Babybeer";
const char password[] = "224236248";
// IFTTT setup
const char *host = "maker.ifttt.com";
const char *Maker_Event = "Marooter";
const char *Maker_Event2 = "Marooter2";
const char *Maker_Event3 = "Marooter3";
const char *Your_Key = "dNbKcrPQDXkJSwbxg-RLUg";
const int buttonPin = Switch_Pin;
const int buttonPin2 = Switch_Pin2;
const int buttonPin3 = Switch_Pin3;
const int ledPin = LED_Pin ; // the number of the LED pin
//------- prototype function ---------
void send_event(const char *event);
void setup()
{
Serial.begin(115200);
Serial.println();
Serial.print("Connecting to ");
Serial.println(ssid);
/*********** Connect to WiFi network ***********/
WiFi.begin(ssid, password);
while (WiFi.status() != WL_CONNECTED)
{
delay(250);
Serial.print(".");
}
Serial.println("");
Serial.println("WiFi connected with Router");
Serial.print("IP = ");
Serial.println(WiFi.localIP());
// Set your pin modes
pinMode(buttonPin, INPUT_PULLUP);
pinMode(buttonPin2, INPUT_PULLUP);
pinMode(buttonPin3, INPUT_PULLUP);
pinMode(ledPin, OUTPUT);
digitalWrite(ledPin, HIGH); // turn off LED
}
void loop()
{
int buttonState = digitalRead(buttonPin);
int buttonState2 = digitalRead(buttonPin2);
int buttonState3 = digitalRead(buttonPin3);
if (buttonState == LOW)
{
Serial.print("Button is pressed!");
send_event(Maker_Event);
}
if (buttonState2 == LOW)
{
Serial.print("Button is pressed!");
send_event(Maker_Event2);
}
if (buttonState3 == LOW)
{
Serial.print("Button is pressed!");
send_event(Maker_Event3);
}
delay(2500);
}
void send_event(const char *event)
{
// set the LED on whle we are sending the event
digitalWrite(ledPin, LOW);
Serial.print("Connecting to ");
Serial.println(host);
// Use WiFiClient class to create TCP connections
WiFiClient client;
const int httpPort = 80;
if (!client.connect(host, httpPort))
{
Serial.println("Connection failed");
return;
}
// We now create a URI for the request
String url = "/trigger/";
url += event;
url += "/with/key/";
url += Your_Key;
Serial.print("Requesting URL: ");
Serial.println(url);
// This will send the request to the server
client.print(String("GET ") + url + " HTTP/1.1\r\n" +
"Host: " + host + "\r\n" +
"Connection: close\r\n\r\n");
// Read all the lines of the reply from server and print them to Serial,
// the connection will close when the server has sent all the data.
while(client.connected())
{
if(client.available())
{
String line = client.readStringUntil('\r');
Serial.print(line);
}
else
{
// No data yet, wait a bit
delay(50);
};
}
// All done
Serial.println();
Serial.println("closing connection");
client.stop();
// Finished sending the message, turn off the LED
digitalWrite(ledPin, HIGH);
}
ไม่มีความคิดเห็น:
แสดงความคิดเห็น