
Week01: Arduino - Basic I/O (Digital Input/Output, Shields, Sensors)

1. ESP8266 on NodeMCU
Deaware เอา NodeMCU devkit มาให้ลองเล่น บอร์ดตัวนี้เป็นบอร์ดที่รวมเอา ESP8266
(ESP-12) + USB to Serial + NodeMCU firmware เข้าไว้ด้วยกัน ทำให้การใช้งานง่ายมากขึ้น ไม่ต้องมีอุปกรณ์ต่อพ่วงเยอะ
แถมมี GPIO เพิ่มเป็น 10 พอร์ท เพียงพอต่อการใช้งาน สำหรับ NodeMCU
devkit ที่ได้มาเป็นบอร์ดเปล่าๆ ใช้ AT Command ในการสั่งงาน ชีวิตไม่อิสระเท่าไร แต่ทางผู้พัฒนา Board ก็มี NodeMCU Firmware ให้คุณสามารถเขียน Lua
ใส่ลงไปได้ ทำให้การใช้งานง่ายมากขึ้น

อ้างอิงรูปภาพ จาก https://cdn3.bigcommerce.com/s-vt19phz/product_images/uploaded_images/pinout.png?t=1491966337
ตัว devkit มี port
GPIO มาให้อยู่ 10 port เป็นแบบ Digital
และที่สำคัญมี Wifi Serial มาให้ด้วย
เพราะฉนั้นขอให้มี Wifi Router ต่ออินเตอร์เน็ตได้
คุณก็สามารถสร้างโครงงาน Internet of Thing ได้ง่ายๆ
จบในบอร์ดเดียว
ปัจจุบันสามารถเขียน Software ด้วย Arduino
IDE ยิ่งทำให้ผู้พัฒนาทุกคนเริ่มจะสนใจเป็นอีกหลายเท่าตัว โดย I/O
ของบอร์ด มีดังนี้
· GPIO
1C (10 bit) 1 ขา
· WiFi a/b/3 ขา
· AD
· การสื่อสารแบบ Serial (Tx,Rx)
Online
Support
·
NodeMCU
GitHub: https:// github.com/nodemcu
· ThaiEasyElect: http://
www.thaieasyelec.com/products/internet-of-things/nodemcu-development- kit-v2-detail.html?gclid=Cj0KEQjwl-e4BRCwqeWkv8TWqOoBEiQAMocbPytjm40atWOSYlaQI7V0O0p- 7asSWryeJ9tCQJNxnpoaAk2-8P8HAQ
· AiyaraFun: http:// www.ayarafun.com/2015/08/introduction-arduino-esp8266-nodemcu/
· Firmware Build and Example: http:// nodemcu-build.com/
2. MAX7219 Display

3. HDC1080 High Accuracy Humidity-Temperature Sensor Module


3. NodeMCU + HDC1080 Sensor

4. Lua Scrip


}
}

· AiyaraFun: http:// www.ayarafun.com/2015/08/introduction-arduino-esp8266-nodemcu/
· Firmware Build and Example: http:// nodemcu-build.com/
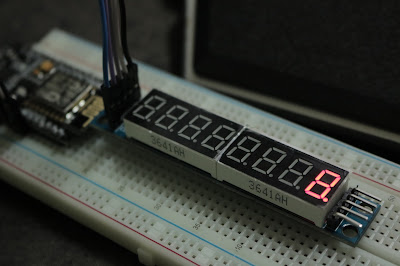
2. MAX7219 Display

7 Segment 8-Digit with MAX7219 Module เป็นโมดูลแสดงผลตัวเลขขนาด
8 หลัก (8 Digits) โดยมี IC เบอร์ MAX7219 เป็นตัวควบคุมการทำงาน
เหมาะสำหรับงานที่มีการแสดงผลด้วยตัวเลข
ใช้งานง่ายสามารถควบคุมแต่ละหลักได้อิสระต่อกัน
The MAX7219 and MAX7221 Led
drivers
These
two integrated circuits from Maxim are for driving either 64 individual Led's,
or up to 8 digits of 7-segment displays. The drivers implement a SPI compatible
slave interface that can be controlled from the Arduino using only 3 of the
digital output pins. An extensive datasheet for the IC's is available from the
Maxim homepage. Since both chips are very similar, I will use the term MAX72XX
for both the MAX7221 and the MAX7219.
LedControl Library
LedControl is a Arduino library for the MAX7221 and
MAX7219. These two chips provide an easy way to control
either an array of 64 LEDs or up to 8 digits
of 7-segment displays. The fourth argument to LedControl(dataPin,clockPin,csPin,numDevices)
is the number of cascaded MAX72XX devices you're using with this LedControl.
The library can address up to 8 devices from a single LedControl-variable.
Wiring the Arduino
The
Gnd-Pins of the MAX72XX have to be connected to one of the Gnd-Pins on the
Arduino board. The positive power-supply pins (+5V/Vcc) can be connected to +5V-Pins
on Arduino-board.The three signal lines (DIn,CLK,Load(/CS)) have to be
connected to three digital outputs on the Arduino board. It depends on the
software which Arduino pins have to be used.
If you
read the datasheet for the MAX72XX you know that the drivers can be cascaded by
simply connecting the signal DOut from one chip to DIn on the next chip. The
signals Clk and Load(/CS) have to be connected in parallel to each MAX72XX.
There is no strict limit as to how many drivers can be cascaded that way. But
the SPI-interface is not capable of any error checking on the transmitted data,
so you are already limited with the length of the cables that run from one
MAX72XX to the next one. If your cables get longer than 10cm between each
MAX72XX you might already run into trouble.
3. HDC1080 High Accuracy Humidity-Temperature Sensor Module


Description
The
HDC1080 is a digital humidity sensor with integrated temperature sensor that
provides excellent measurement accuracy at very low power. The HDC1080 operates
over a wide supply range, and is a low cost, low power alternative to
competitive solution in a wide range of common applications. The humidity and
temperature sensors are factory calibrated.
Features
·
Relative
Humidity Accuracy ±2% (typical)
·
Temperature
Accuracy ±0.2°C (typical)
·
Excellent
Stability at High Humidity
·
14
Bit Measurement Resolution
·
100
nA Sleep Mode Current
·
Average
Supply Current:
o
710
nA @ 1sps, 11 bit RH Measurement
o
1.3
µA @ 1sps, 11 bit RH and Temperature Measurement
·
Supply
Voltage 2.7 V to 5.5 V
·
Small
3 mm × 3 mm Device Footprint
·
I2C
Interface
การทดลอง
1. NodeMCU
1.1 Add
NodeMCU Board to Arduino IDE 1.8.x (ตาม http://www.homeofmaker.com/
p=1023)
1.2สำคัญคือใส่URL>>ลงในAdditionBoardManagerURLs:ดังนี้ http://arduino.esp8266.com/stable/package_esp8266com_index.json


p=1023)
1.2สำคัญคือใส่URL>>ลงในAdditionBoardManagerURLs:ดังนี้ http://arduino.esp8266.com/stable/package_esp8266com_index.json

ที่ช่อง Additional Board Manager URLs
ใส่ http://arduino.esp8266.com/package_esp8266com_index.json
แล้วกด OK

Tools > Board > Boards Manager

ที่ช่อง Type เลือก Contributed แล้วจะมี esp8266 ให้เรากด Install

รอ Install จนเสร็จ ก็จะได้หน้าตาแบบนี้แครับ

1.3 ทดสอบการทำงาน ด้วยโปรแกรม File à Example à Basic à Blink


เมื่ออัพโหลดลงบอร์ดเสร็จแล้ว จะมีไฟกระพริบที่ตัวบอร์ด
_____________________________________________________________________________
2.
NodeMCU + MAX7219 Display
2.1
Add
Lib : https://github.com/squix78/MAX7219LedMatrix
2.2
Wiring
MAX7219_7segment {Vcc, GND, DIN, CS, CLK}
à {3.3V, GND, D7, D8, D5}
2.3
Open
File → Example → MAX7219LedMatrix-master → AnimateText
2.4
Change
{ NUMBER_OF_DEVICES 1, CS_PIN D8 } and
Click Upload
ตัวอย่าง code
#include <SPI.h>
#include "LedMatrix.h"
#define NUMBER_OF_DEVICES 1
#define CS_PIN D8
LedMatrix ledMatrix =
LedMatrix(NUMBER_OF_DEVICES, CS_PIN);
void setup() {
Serial.begin(115200); // For debugging output
ledMatrix.init();
ledMatrix.setIntensity(4); // range is 0-15
ledMatrix.clear();
ledMatrix.commit(); // commit send buffer to the displays
}
void loop() {
SendData2MAX7129(1, 0xff);
delay(500);
SendData2MAX7129(1, 0);
delay(500);
}
//===================================================
// ##SegPosition >> 87654321 ##SegData
>> tabcdefg
//===================================================
void SendData2MAX7129(byte SegPosition, byte
SegData)
{ digitalWrite(CS_PIN, LOW);
SPI.transfer (SegPosition);
SPI.transfer (SegData);
digitalWrite (CS_PIN, HIGH);
}

3. NodeMCU + HDC1080 Sensor
3.1 Add Lib : https://github.com/closedcube/ClosedCube_HDC1080_Arduino3.2 ทดสอบโปรแกรม File à Example à ClosedCube HDC1080 à hdc1080demo
________________________________________________________________
ภาษา Lua (pronounced 'LOO-ah' หรือออกเสียงว่า 'ลัว' หรือ 'ลูอ่า' ในภาษาโปรตุเกส) อาจไม่เป็นที่รู้จักสำหรับโปรแกรมเมอร์ทั่วไปในวงกว้าง แต่ก็เป็นภาษาคอมพิวเตอร์ที่น่าสนใจ และสามารถนำมาใช้งานได้ ลองมาทำความรู้จักกับภาษานี้ โดยเขียนสรุปเป็นข้อๆ ดังนี้
· Lua เป็นภาษาประเภท Scripting / Interpreted Language หรือภาษาสคริปต์ (อยู่ในประเภทเดียวกับภาษาอย่างเช่น Python)· มีต้นกำเนิดมาจากทีมพัฒนาในสถาบันการศึกษาแห่งหนึ่งในประเทศบราซิล (Pontifical Catholic University of Rio de Janeiro, Brazil) ในราวปีค.ศ. 1993· Lua script จะถูกแปลงให้เป็น Bytecode ตามรูปแบบคำสั่งของคอมพิวเตอร์เสมือน (Virtual Machine) สำหรับภาษานี้ (เช่นเดียวกับกรณีของ Python และ Java ที่มีการทำงานในลักษณะนี้)· เป็นภาษาที่ชนิดของข้อมูลสำหรับตัวแปรปรับเปลี่ยนได้ (Dynamically-typed language)· มีชนิดข้อมูลพื้นฐานคือ boolean (true,false), numbers (integer & double-precision floating point) และ string· มีโครงสร้างข้อมูลอย่างเช่น อาร์เรย์(array) ตาราง(table) ซึ่งเป็น associative array และ เซต(set)· มีการจัดการหน่วยความจำ เช่น การจองและคืนหน่วยความจำในขณะทำงาน (automatic memory management & garbage collection)· ตัวแปลคำสั่งของภาษา Lua (Lua Interpreter) มีขนาดเล็ก(small & light-weight) และเขียนด้วยภาษา C· เป็นซอฟต์แวร์ประเภท Opensource (MIT license สำหรับเวอร์ชัน 5.x) ดังนั้นจึงใช้งานได้ฟรี· ใช้ได้หลายแพลตฟอร์ม(multi-platform programming language) อย่างเช่น Windows, Linux, Mac OS X· มีการใช้งานกับบอร์ดไมโครโทรลเลอร์ได้ อย่างเช่น ESP8266/NodeMCU, WiFiMCU/EMW3165 เป็นต้น· สามารถเรียกใช้จากภาษาอื่นได้ (embeddable) มีการนำไปใช้ในการพัฒนาเกมส์ หรือการพัฒนา Mobile Apps อย่างเช่น Corona SDK· อุปกรณ์เครือข่าย อย่างเช่น Wireless Router ที่ใช้ระบบปฏิบัติการ OpenWrt ซึ่งเป็น Linux และมีการใช้โปรแกรม Luci ซึ่งพัฒนาด้วยภาษา Lua สำหรับการจัดการผ่านหน้าเว็บเพื่อตั้งค่าต่างๆ ของระบบ (Web configuration interface)
สำหรับการทดลองจะอยู่ในลิ้งค์ด้านล่างนี้ครับ
_______________________________________________________________________
คำถามท้ายการทดลอง
1. ต้องการแสดงข้อความ
ปรับปรุงจาก code ตัวอย่างนี้
#include <SPI.h>
#include "LedMatrix.h"
#define NUMBER_OF_DEVICES 1
#define CS_PIN D8
LedMatrix ledMatrix =
LedMatrix(NUMBER_OF_DEVICES, CS_PIN);
void setup() {
Serial.begin(115200);
// For debugging output
ledMatrix.init();
ledMatrix.setIntensity(4); // range is 0-15
}
void loop() {
ledMatrix.clear();
ledMatrix.commit(); // commit send buffer to the displays
delay(1000);
Send2MAX7129(5, 1, 0);
Send2MAX7129(4,
2, 0);
Send2MAX7129(3, 3, 1);
Send2MAX7129(2, 4, 0);
Send2MAX7129(1, 5, 0);
delay(1000);
}
//===================================================
//===================================================
void Send2MAX7129(byte SegPosition, byte Value,
bool dotDigit)
{ const static byte charTable [] =
{
B01111110, B00110000, B01101101, B01111001,
B00110011, B01011011, B01011111, B01110000,
B01111111, B01111011, B01110111, B00011111,
B00001101, B00111101, B01001111, B01000111
};
Value =
charTable[Value];
if
(dotDigit == 1) Value |= 0x80;
digitalWrite(CS_PIN, LOW);
SPI.transfer (SegPosition);
SPI.transfer (Value);
digitalWrite (CS_PIN, HIGH);
Serial.print(Value);
}
//===================================================
// ##SegPosition >> 87654321 ##SegData
>> tabcdefg
//===================================================
void SendData2MAX7129(byte SegPosition, byte
SegData)
{ digitalWrite(CS_PIN, LOW);
SPI.transfer (SegPosition);
SPI.transfer (SegData);
digitalWrite
(CS_PIN, HIGH);
}
_______________________________________________________________________
2. ใช้ Arduino IDE ในการพัฒนาโปรแกรมให้อ่านอุณหภูมิจากเซ็นเซอร์แล้วแสดงผลที่
MAX7219_7Segment Display โดยมีรูปแบบดังรูป

code ที่ใช้
// TestMax7219_2
//
#include <SPI.h>
#include "LedMatrix.h"
#include <Wire.h>
#include "ClosedCube_HDC1080.h"
//
#include <SPI.h>
#include "LedMatrix.h"
#include <Wire.h>
#include "ClosedCube_HDC1080.h"
ClosedCube_HDC1080 hdc1080;
#define NUMBER_OF_DEVICES 1
#define CS_PIN D8
LedMatrix ledMatrix = LedMatrix(NUMBER_OF_DEVICES, CS_PIN);
#define CS_PIN D8
LedMatrix ledMatrix = LedMatrix(NUMBER_OF_DEVICES, CS_PIN);
void setup() {
Serial.begin(115200); // For debugging output
ledMatrix.init();
ledMatrix.setIntensity(8); // range is 0-15
ledMatrix.clear();
ledMatrix.commit(); // commit send buffer to the displays
Serial.begin(9600);
Serial.println("ClosedCube HDC1080 Arduino Test");
Serial.begin(115200); // For debugging output
ledMatrix.init();
ledMatrix.setIntensity(8); // range is 0-15
ledMatrix.clear();
ledMatrix.commit(); // commit send buffer to the displays
Serial.begin(9600);
Serial.println("ClosedCube HDC1080 Arduino Test");
// Heater off, 14 bit Temperature and Humidity Measurement Resolution
hdc1080.begin(0x40);
hdc1080.begin(0x40);
Serial.print("Manufacturer ID=0x");
Serial.println(hdc1080.readManufacturerId(), HEX); // 0x5449 ID of Texas Instruments
Serial.print("Device ID=0x");
Serial.println(hdc1080.readDeviceId(), HEX); // 0x1050 ID of the device
Serial.println(hdc1080.readManufacturerId(), HEX); // 0x5449 ID of Texas Instruments
Serial.print("Device ID=0x");
Serial.println(hdc1080.readDeviceId(), HEX); // 0x1050 ID of the device
}
void loop() {
{
Serial.print("T=");
Serial.print(hdc1080.readTemperature());
Serial.print("C, RH=");
Serial.print(hdc1080.readHumidity());
Serial.println("%");
delay(300);
Serial.print("T=");
Serial.print(hdc1080.readTemperature());
Serial.print("C, RH=");
Serial.print(hdc1080.readHumidity());
Serial.println("%");
delay(300);
int xx = (int)(hdc1080.readTemperature() * 10);
Send2MAX7129(8,xx/100, 0); xx = xx %100;
Send2MAX7129(7,xx/10, 1); xx = xx %10;
Send2MAX7129(6,xx, 0);
Send2MAX7129(5,16, 0);
Send2MAX7129(8,xx/100, 0); xx = xx %100;
Send2MAX7129(7,xx/10, 1); xx = xx %10;
Send2MAX7129(6,xx, 0);
Send2MAX7129(5,16, 0);
int yy = (int)(hdc1080.readTemperature() * 10);
Send2MAX7129(4,yy/100, 0); yy = yy % 100;
Send2MAX7129(3,yy/10, 1); yy = yy %10;
Send2MAX7129(2,yy, 0);
Send2MAX7129(1,17, 0);
delay(300);
Send2MAX7129(4,yy/100, 0); yy = yy % 100;
Send2MAX7129(3,yy/10, 1); yy = yy %10;
Send2MAX7129(2,yy, 0);
Send2MAX7129(1,17, 0);
delay(300);
}
}
//===================================================
//===================================================
void Send2MAX7129(byte SegPosition, byte Value, bool dotDigit)
{ const static byte charTable [] =
{ B01111110, B00110000, B01101101, B01111001,
B00110011, B01011011, B01011111, B01110000,
B01111111, B01111011, B01110111, B00011111,
B00001101, B00111101, B01001111, B01000111,
B00001101, B00010111
}; //
Value = charTable[Value];
if (dotDigit == 1) Value |= 0x80;
digitalWrite(CS_PIN, LOW);
SPI.transfer (SegPosition);
SPI.transfer (Value);
digitalWrite (CS_PIN, HIGH);
Serial.print(Value);
}
if (dotDigit == 1) Value |= 0x80;
digitalWrite(CS_PIN, LOW);
SPI.transfer (SegPosition);
SPI.transfer (Value);
digitalWrite (CS_PIN, HIGH);
Serial.print(Value);
}
//===================================================
// ##SegPosition >> 87654321 ##SegData >> tabcdefg
//===================================================
void SendData2MAX7129(byte SegPosition, byte SegData)
{ digitalWrite(CS_PIN, LOW);
SPI.transfer (SegPosition);
SPI.transfer (SegData);
digitalWrite (CS_PIN, HIGH);
}
// ##SegPosition >> 87654321 ##SegData >> tabcdefg
//===================================================
void SendData2MAX7129(byte SegPosition, byte SegData)
{ digitalWrite(CS_PIN, LOW);
SPI.transfer (SegPosition);
SPI.transfer (SegData);
digitalWrite (CS_PIN, HIGH);
}

_______________________________________________________________________
เอกสาร แหล่งข้อมูลอ้างอิง
·
HDC1080
- https://learn.adafruit.com/adafruit-hdc1008-temperature-and-humidity-sensor-breakout?view=all
_______________________________________________________________________
ไม่มีความคิดเห็น:
แสดงความคิดเห็น